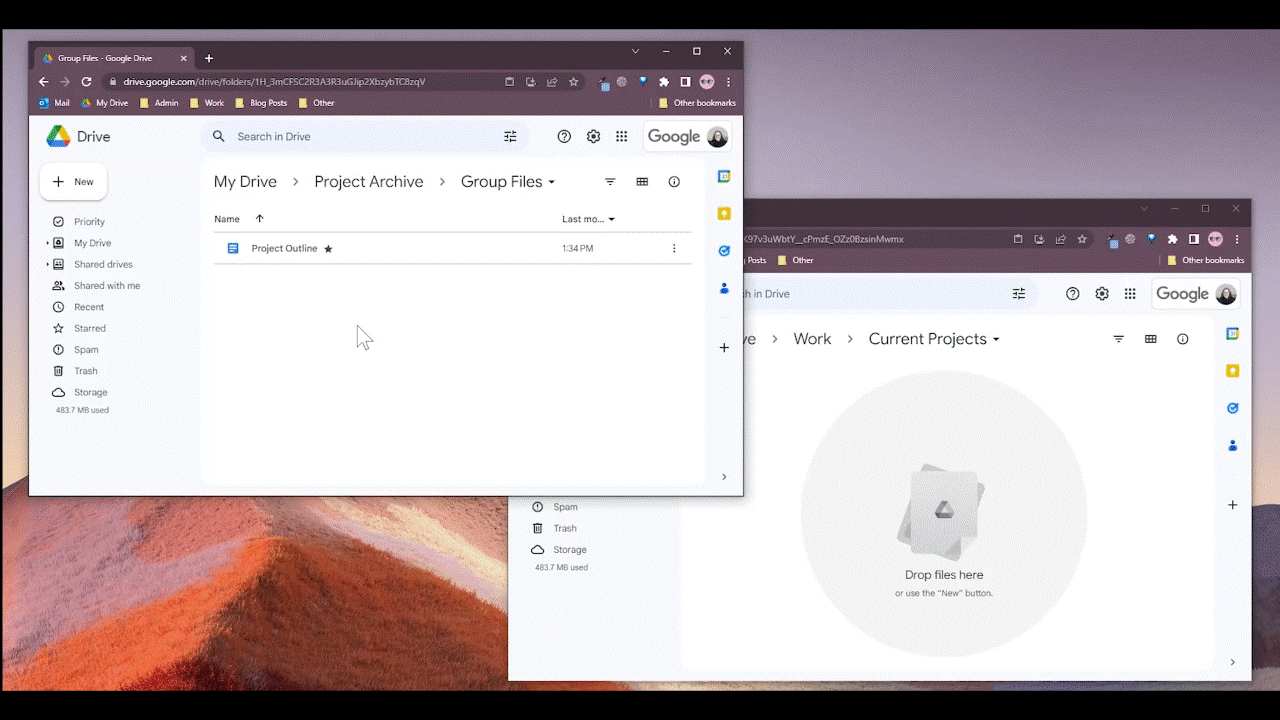
We live in a world where all of the information we could possibly need is right at our fingertips, but sometimes that can be overwhelming. Any Google Slides users will know that Google Drive stores important documents, like Slides presentations, Docs and Sheets, and it’s also where you’ll find any presentations and files that people have shared with you. As it fills up, though, Drive can get tricky to navigate. If you’ve ever tried to find a specific document, only to be met with a million similarly-named files that take you 3-5 business days to sift through, you know the struggle. We’ve been there, too. That’s why your friendly neighborhood presentation nerds are back with an all-new article on Productivity tips and tricks for Google Drive! We’ve compiled a list of tips and tricks to help you optimize your Google Drive experience and get the most out of Google Workspace.
You know that one file you keep having to open, that’s 15 subfolders deep in a chaotic shared Drive? Or that folder that’s gotten lost in some dark corner of your own Drive? Yeah, same. We’ve got two tricks to help you combat your Drive-searching woes.
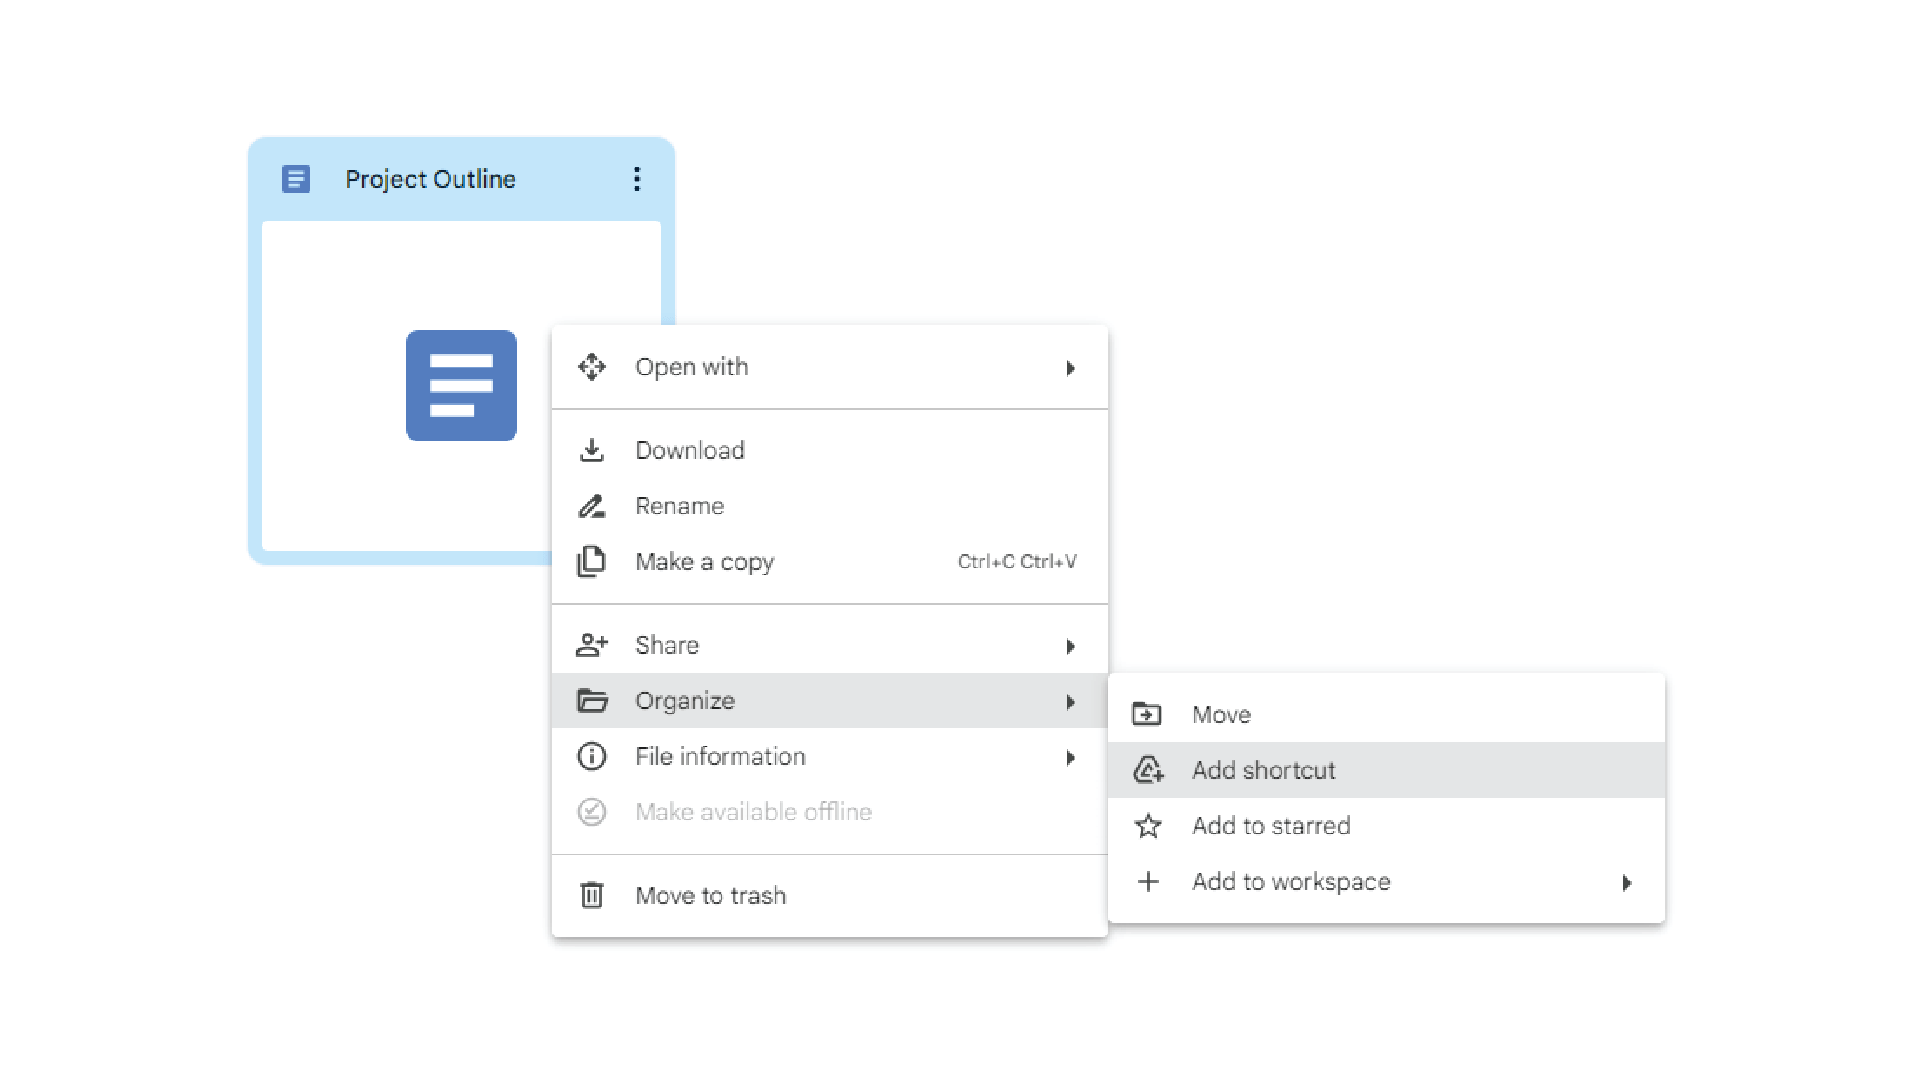
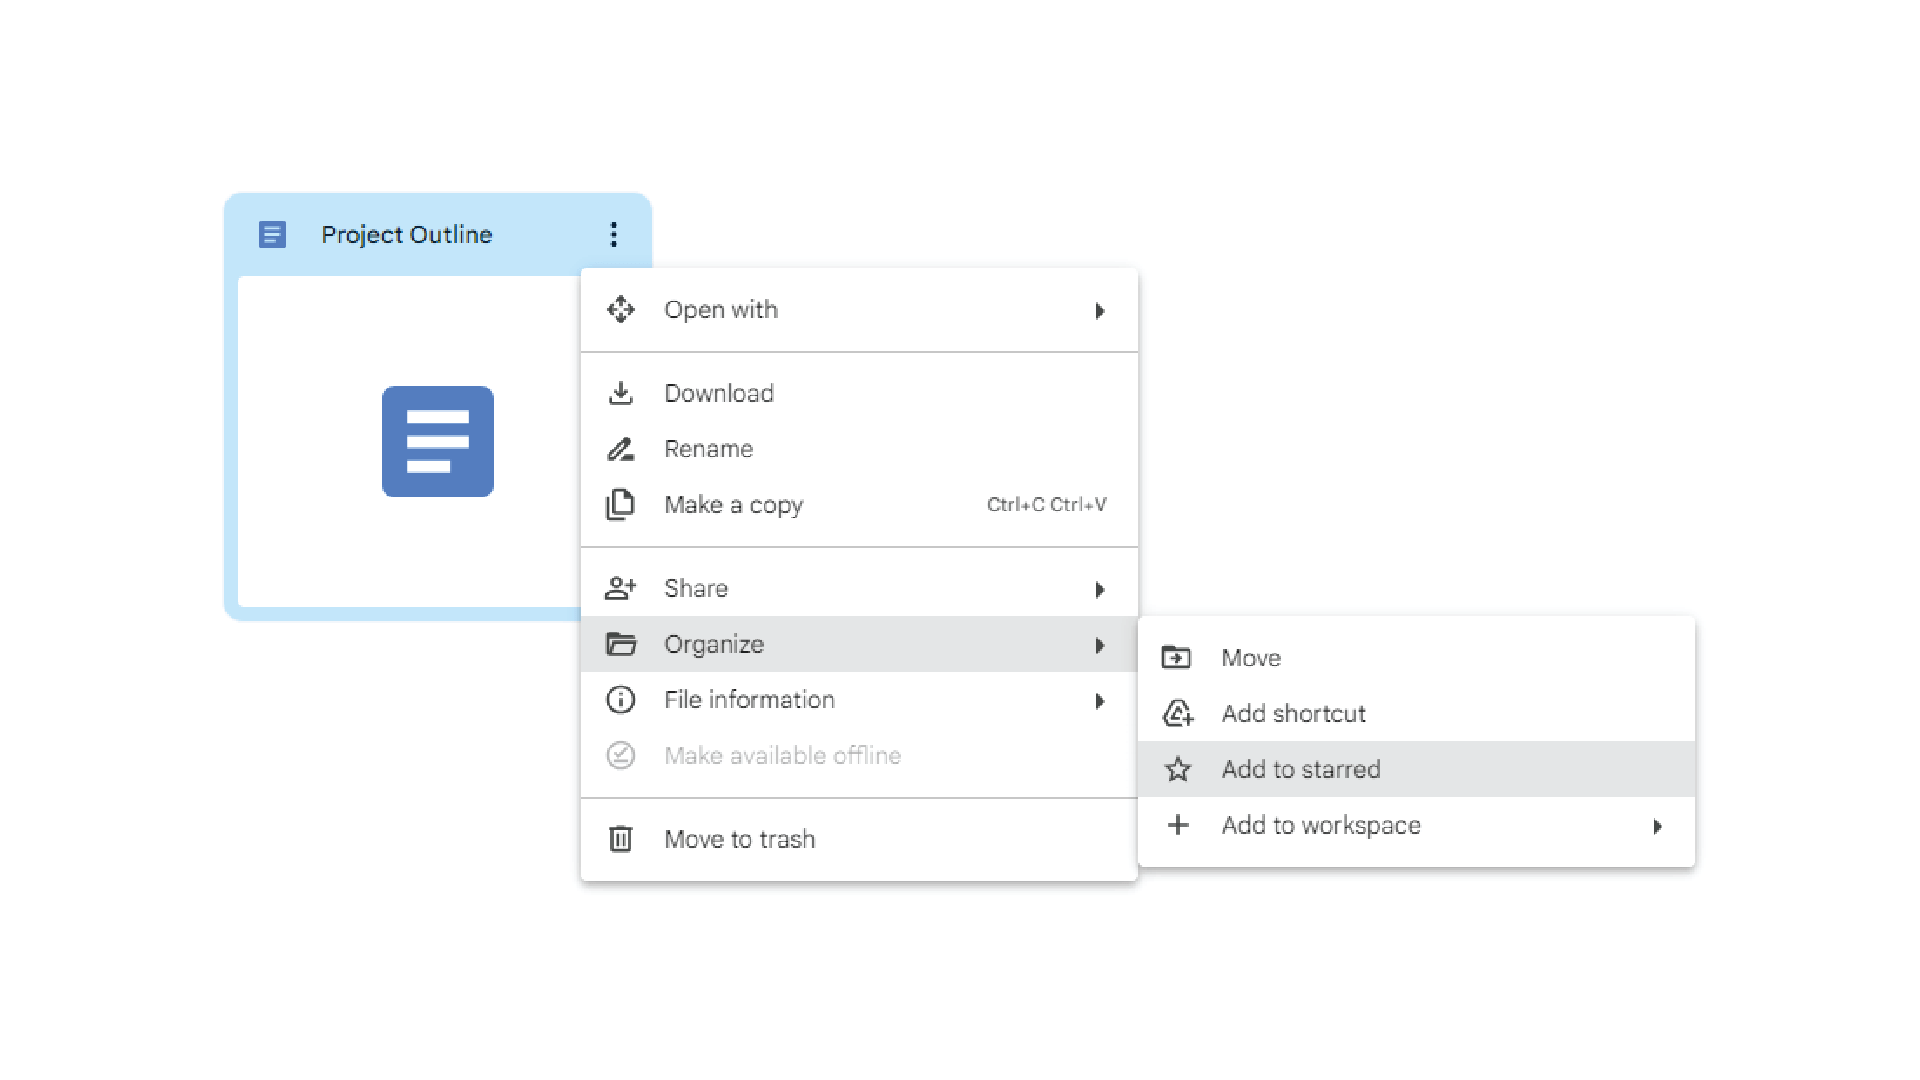
Create shortcuts
Just as you can create a shortcut to a file or folder on your computer, you can create one in Google Drive. Here’s how it’s done:
Right-click on the file or folder you want to create a shortcut to, then click Organize, then Add shortcut.
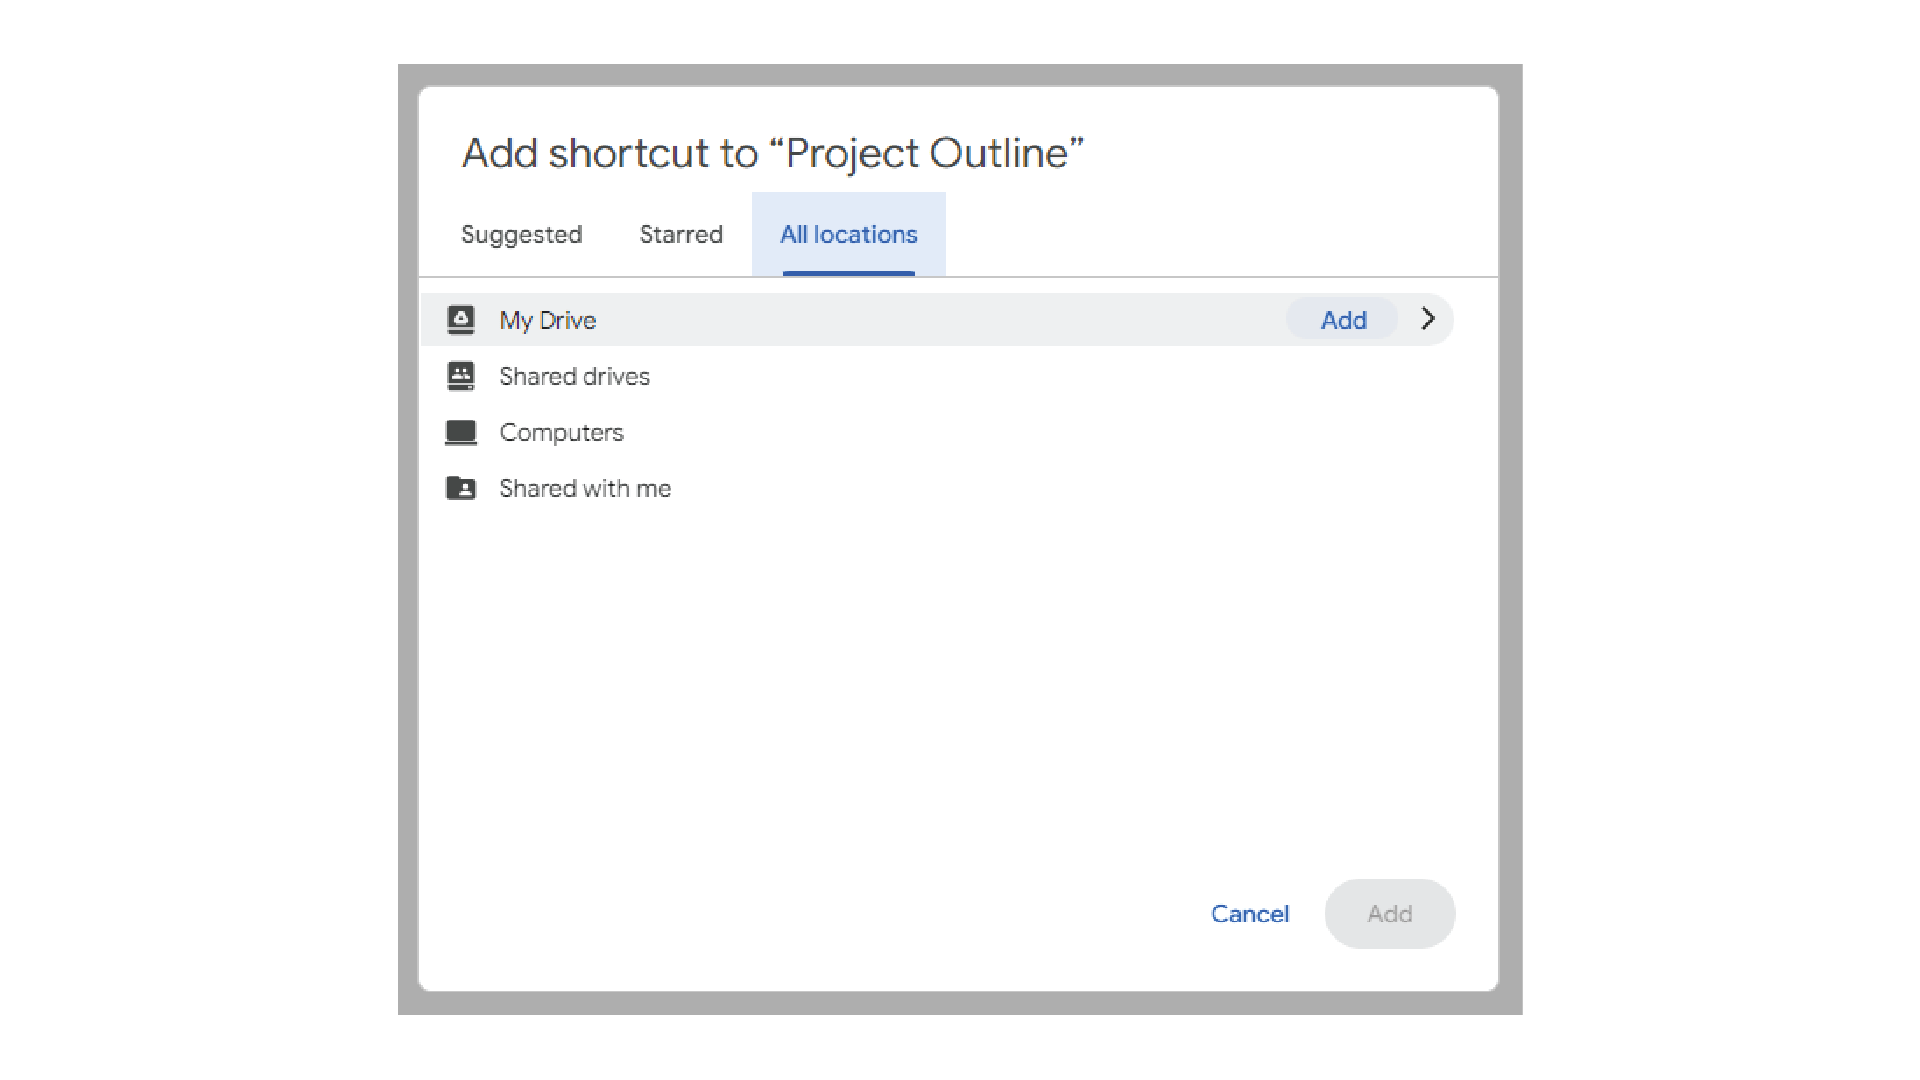
Choose where you want to save your shortcut and click Add.
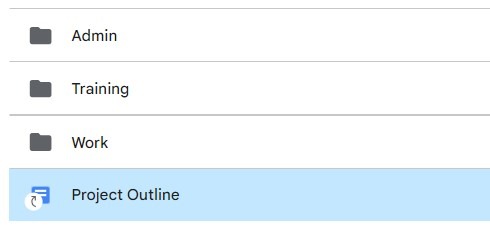
Voila! You’ve got an easily accessible shortcut that saves you a whole lot of searching.
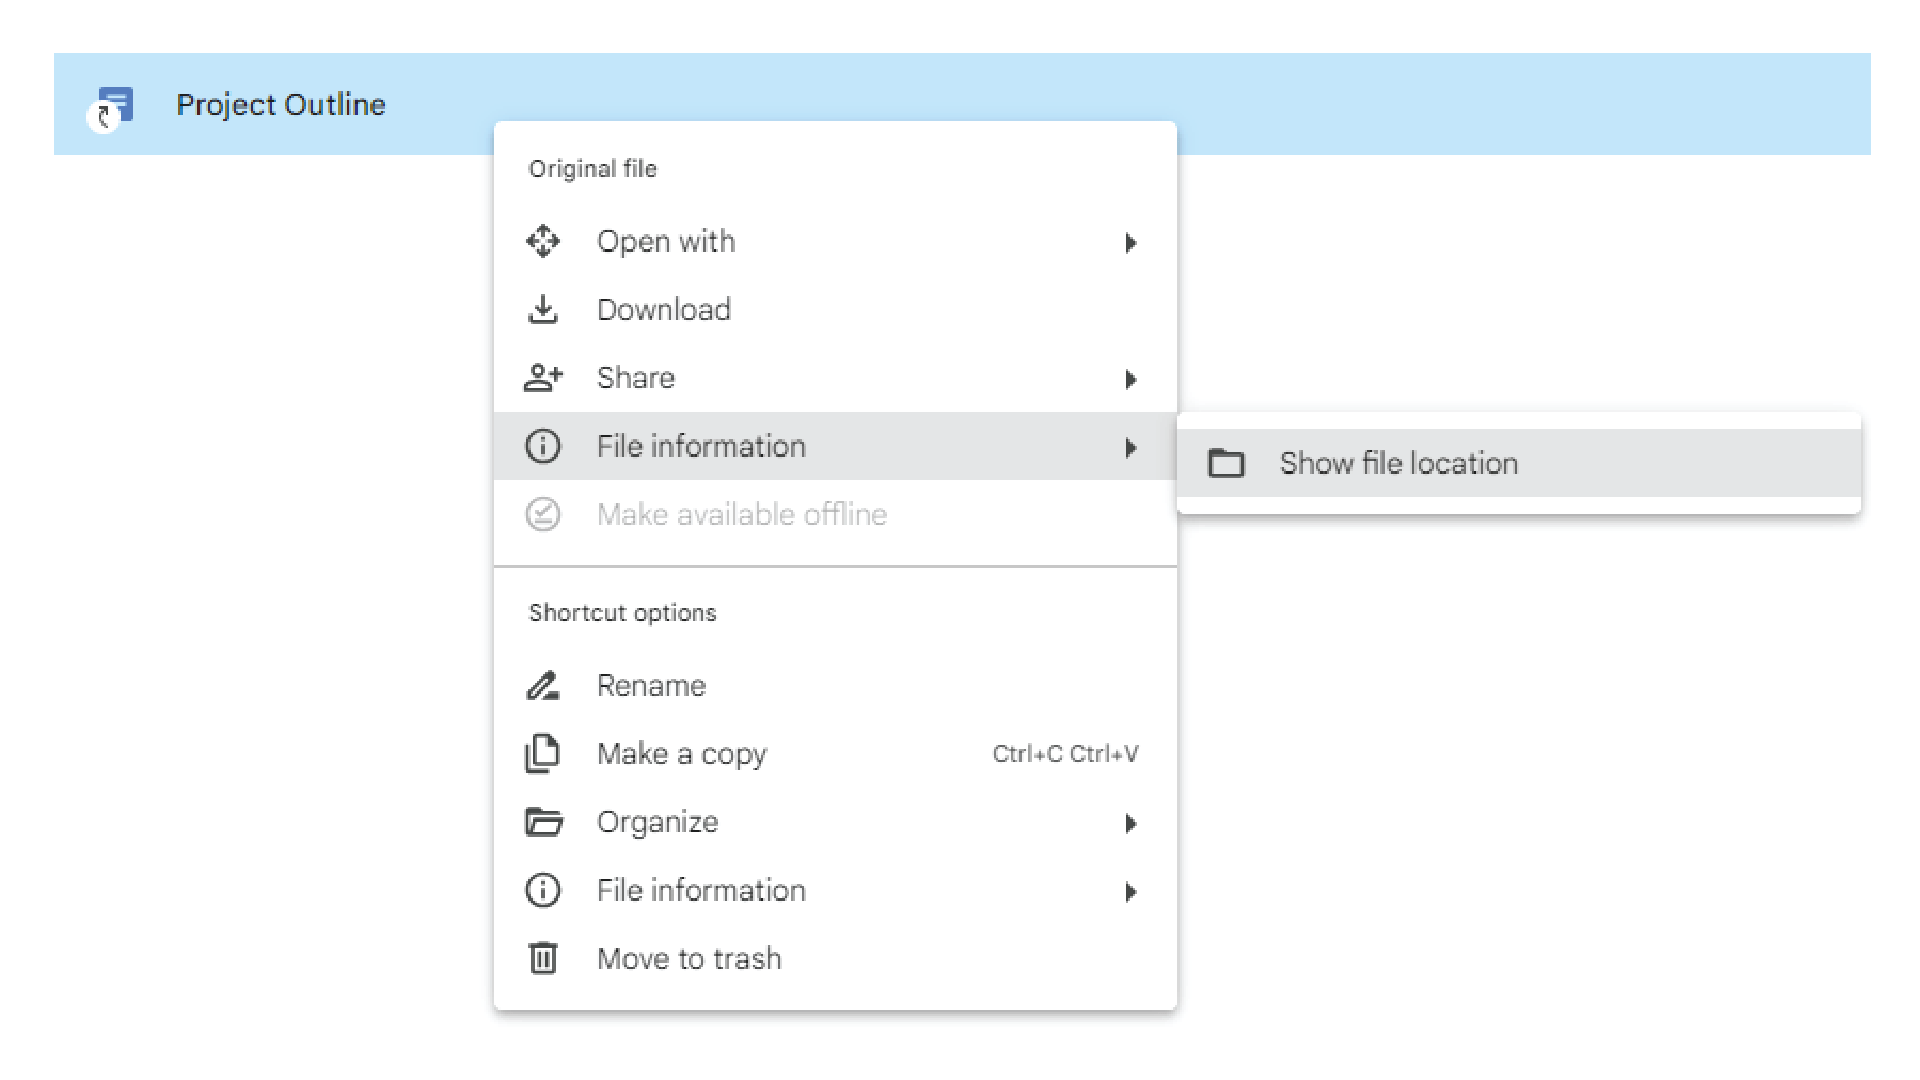
Bonus: You can easily navigate to the location of the original file by right-clicking on the shortcut, going to File information, and then clicking Show file location. That way, even if the file is moved, you can always find it using your shortcut.
Add items to Starred
The Starred tab lets you easily access important or frequently used items from one place. You can think of it as your Bookmarks on Google Drive. Here’s how you add items to the tab:
Right-click on the file or folder you want to add to the Starred tab, then select Organize, then Add to starred.
A star will appear next to the file, so you know it’s been added to the tab.
Open the Starred tab in your navigation panel and you’ll find all the files and folders you’ve starred. It’s as easy as that!
Organize your Google Drive
If you don’t have the time (or, frankly, the desire) to tidy up your Drive, we can’t blame you. We all get busy, we have more important things to do. That’s why the following tricks are among our favorites for saving time when using Google Drive.
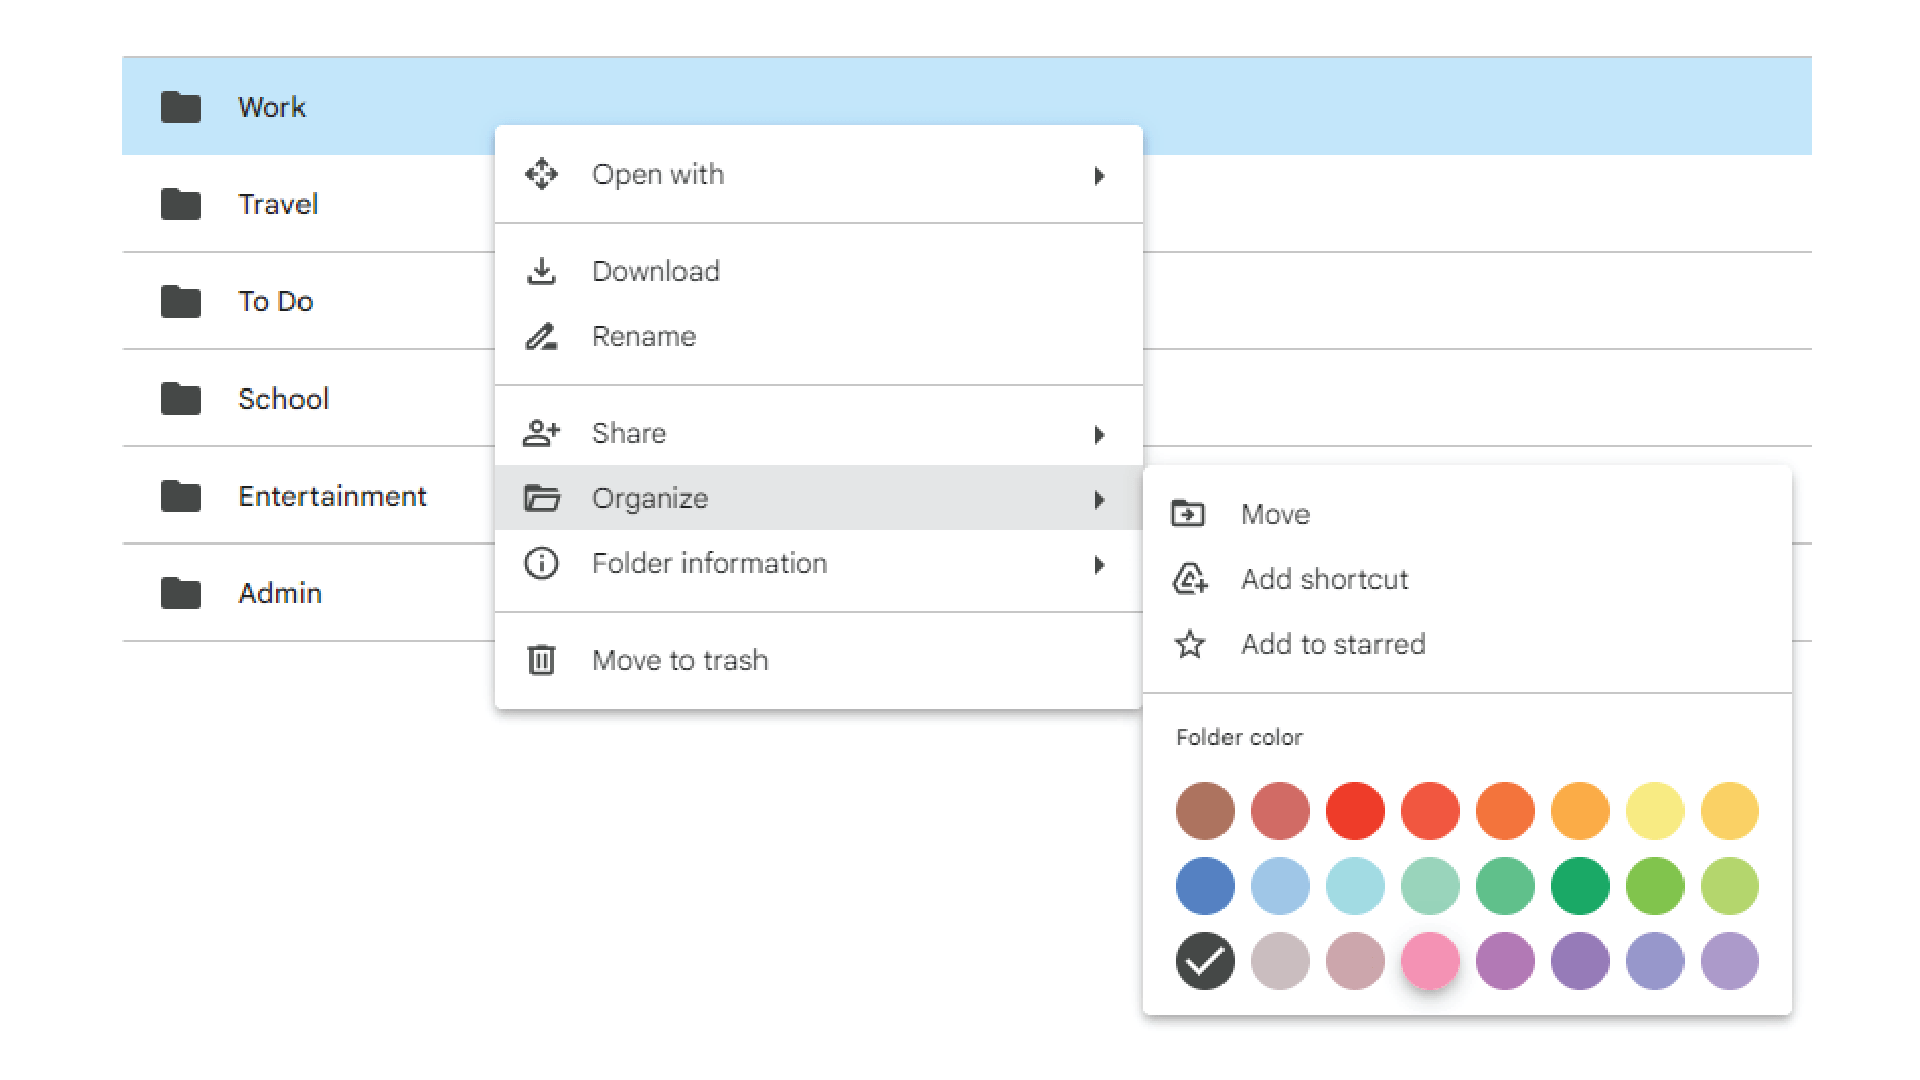
Colour-code folders
This is a really simple way to keep track of your folders in Drive. Rather than moving them around, you can categorize folders by colour. This is how you do it:
Right-click on the folder you want to change the colour of, then select Organize. A menu will appear with different colours that you can choose from.
Click on the colour you’d like to use for your folder and you’re done! The menu will automatically close and you’ll have a delightfully colour-coded folder.
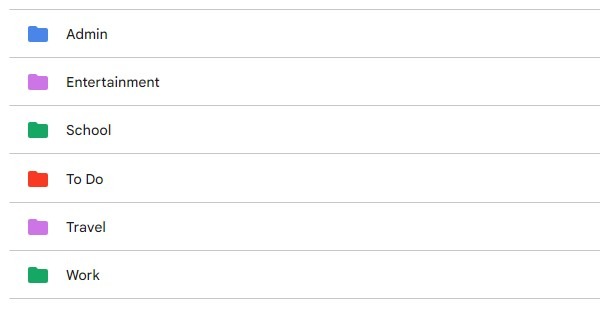
Tip: You can colour-code your folders by category. For example, assign one colour to ‘work and school’, and another colour to ‘ admin’. You can also use a colour that draws your eye to an important folder, so you can find it quickly.
Move items with ease
You might know that Google Drive has a ‘Move to’ feature that lets you move files or folders to different locations. The problem is, if the item is several subfolders deep and you need to move it to an equally deep location, the process can take ages. Here’s how you can move files quickly and easily.
Cut and paste
Locate and select the file you want to move. To cut the file from its current location, use your keyboard and press Ctrl+X on a Windows device, or ⌘+X on a Mac OS device. Then, navigate to the location where you want to move the file and press Ctrl+V or ⌘+V to paste it. Cutting and pasting files is only accessible using keyboard shortcuts. Unfortunately, you can’t make these changes by right clicking.
Tip: This works for copying files as well. To copy the file from its current location, press Ctrl+C on a Windows device (or ⌘+C on a Mac OS device). Then, navigate to the location where you want to duplicate the file and press Ctrl+V (or ⌘+V) to paste it. At the time of writing, copying folders is not currently supported.
Declutter your Google Drive
Eliminate duplicates
This one goes out to the people who have versions upon versions of the same file clogging up their Drive. With this trick, you can say goodbye to adding random letters at the end of your file names, and say hello to a clutter-free Drive. This is how you keep multiple versions of a file without creating duplicates on Google Drive:
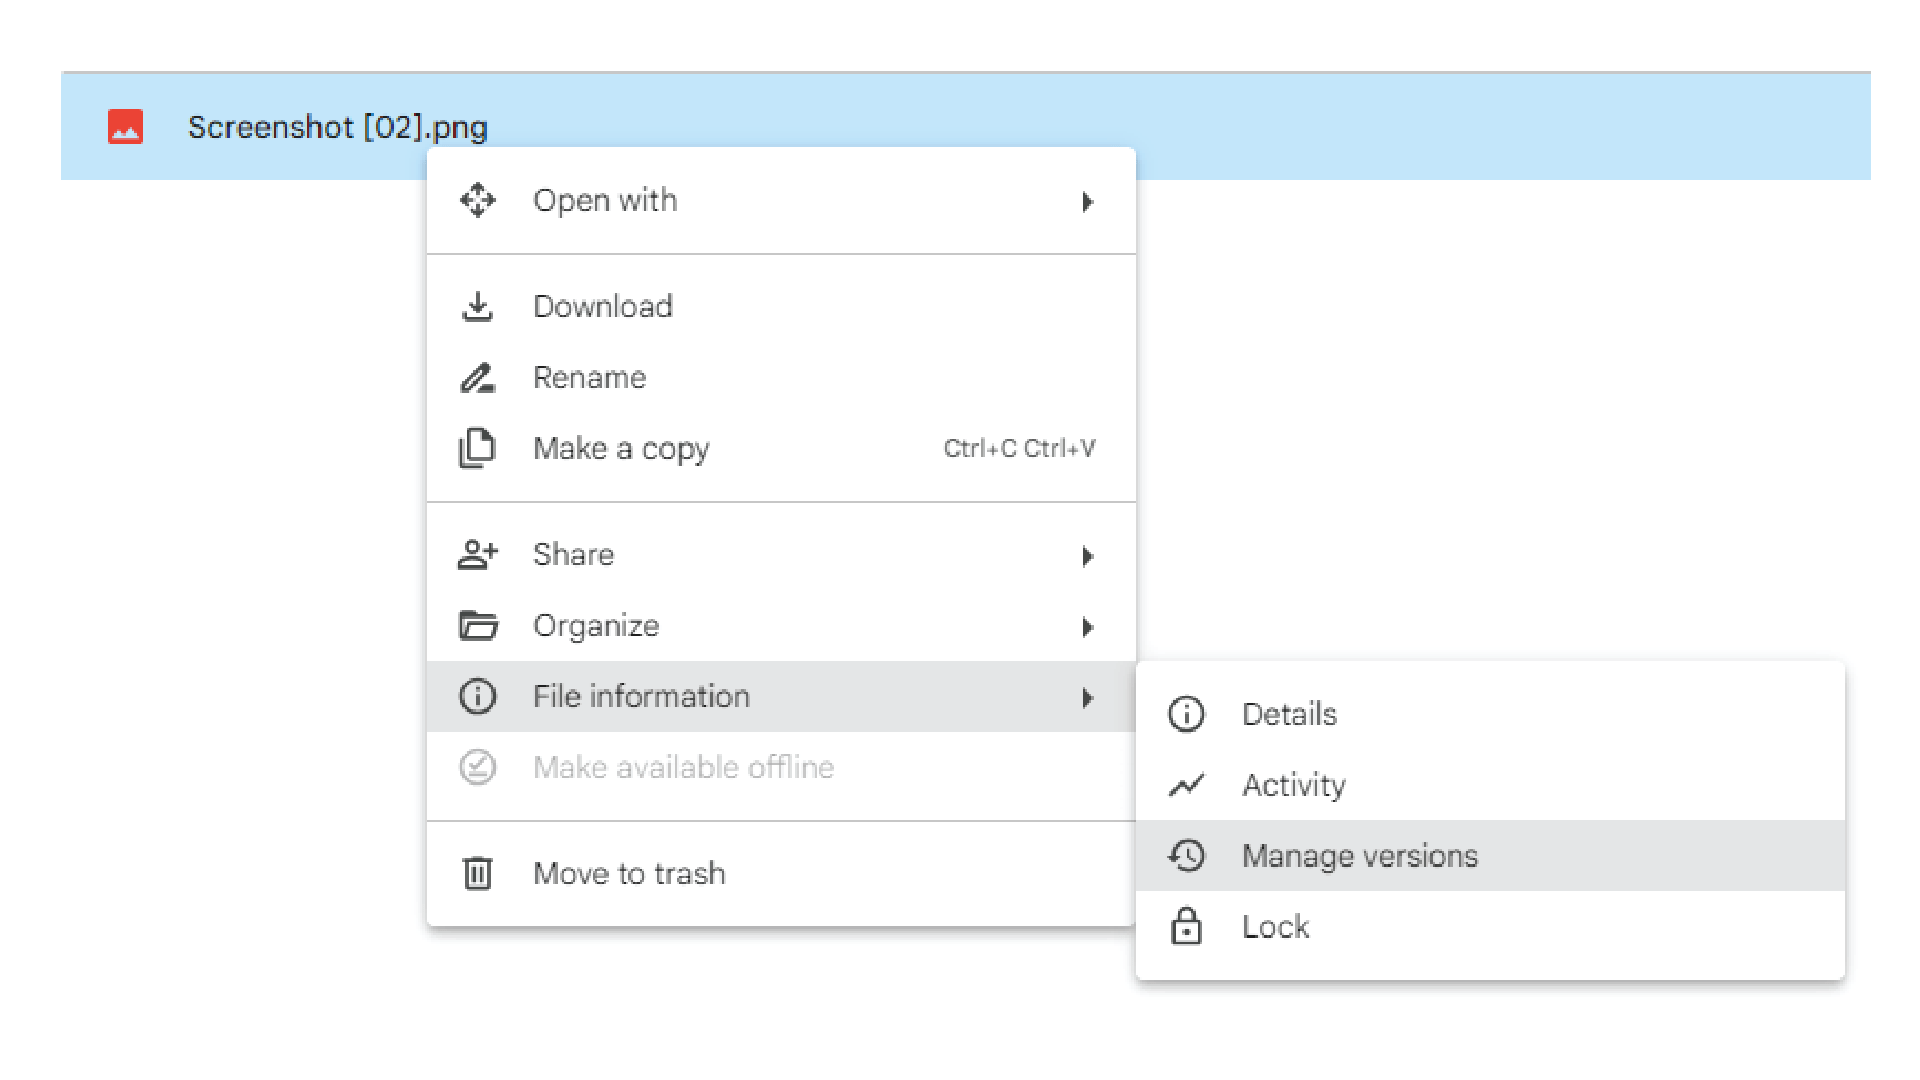
Right-click on the file you want to keep multiple versions of, then select File information, and then click Manage versions.
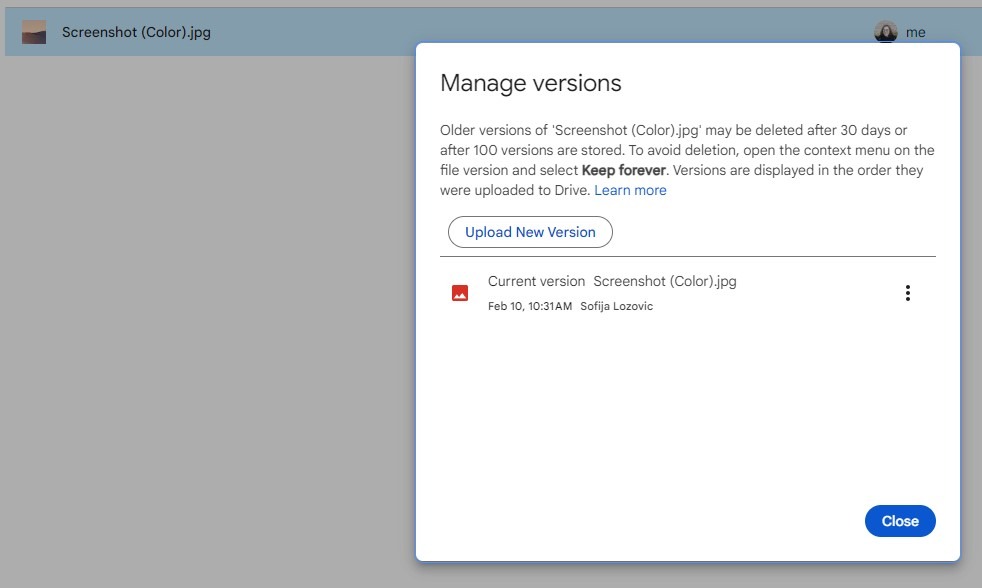
A Manage versions window will appear, showing you all versions of the file that have been uploaded. If you haven’t uploaded other versions, the window will only show the current version.
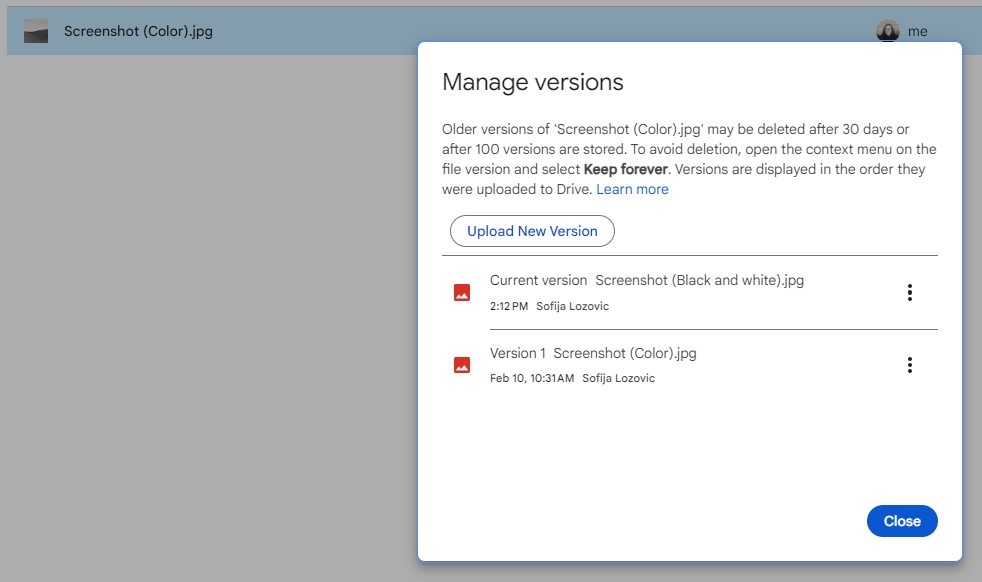
To upload a new version of the file, click Upload New Version. Select a file from your device and upload it. The new version you uploaded will appear at the top of the list and will have Current version written next to the file name. Older versions will appear below.
To manage a previous version, click the three dots icon on the right of the file. A menu with more actions will appear, which lets you download or delete that version. You can also choose whether to keep that version in your Drive forever. If you uncheck the Keep forever option, the file version will be deleted after 30 days.
Note: This feature only works for specific files types, such as images, videos, and PDFs. It doesn’t work for Google files, such as Docs, Slides, or Sheets. You can learn more about previous versions of Google files in the Find out what’s changed in a file article.
Tip: If you’re struggling to manage your storage space on your Drive, check out this Google Drive Help blog post for some helpful tips.
That’s a wrap, folks! We hope this article helps you spend less time looking for presentations and more time making them fabulous. Speaking of making fabulous presentations, if you’re looking for tips and tricks in that department, check out some of our other blog posts written by our Google Slides gurus: How to insert video and audio into Google Slides or Editable map for Google Slides.
If you're using Google Slides regularly then it's worth getting to know how you can integrate it with your other favorite Google Workspace programs - this time, Google Keep!
Google Slides templates are a great starting point to improve the look and feel of your presentation. They’re fab as they’re accessible and low cost, but it’s important to remember that even well-designed presentations can be ineffective if the content is text heavy.
As presentation nerds, we at BrightCarbon have had plenty of opportunity to get to know ins and outs of Google’s browser-based presentation tool. This guide will cover everything you need to know about Google Slides - from the very basics to the most advanced features - and will provide you with the know-how to make brilliant slides, quickly and easily.
BrightCarbon are a great partner in our growth. They are great to work with, very consultative, and professional. I could not recommend working with them more highly.